Showing posts with label recipe. Show all posts

Tuesday, May 10, 2011

birthday cake {lemon poppy seed cake with raspberry curd}

I have no qualms about making my own birthday cake and this year that's just what I did. On Mother's Day I was scheduled to work, which also happened to be 2 days before my birthday and the beginning of National Nurse's Week, so I decided to celebrate by bringing cake. Growing up with a mom who bakes amazing desserts and the best bakery in town, Icing on the Cake, there was never a birthday or special event that I didn't have some amazing dessert to celebrate with. With my birthday being in Spring time I have always enjoyed birthday desserts that were fresh, light and with berries. The inspiration for my birthday cake selection this year came from my favorite cake at Icing on the Cake, lemon poppy seed cake with raspberry filling and cream cheese frosting. After searching many websites and blogs I came across a recipe from the blog Chicken on the Green, which I have featured below. Everyone at work and myself especially loved the cake. It was perfectly moist, pretty, and the perfect combination of Spring time flavors!

Lemon Poppy Seed Cake (adapted from Annie's Eats)


Ingredients:
For the Cake:

2 1/3 cups cake flour
2 3/4 tsp. baking powder
1/4 tsp. salt
1 1/2 tbsp. poppy seeds
5 large egg whites, at room temperature
1/4 tsp. cream of tartar
1 1/2 cups sugar
2 tbsp. finely grated lemon zest
12 tbsp. unsalted butter, at room temperature
1 cup 2% milk

For Raspberry Curd Filling:

8 tbsp. unsalted butter
1 12-oz. package frozen raspberries, thawed
5 large egg yolks, lightly beaten
3/4 cup sugar
Pinch of salt

For Vanilla Lemon Cream Cheese Frosting: (adapted from All Recipes)

8 oz package reduced fat cream cheese, thawed
1 stick butter
3/4 tsp lemon extract
1 tsp vanilla extract
5 cups powdered sugar


Directions:
For the Cake:

1. Preheat oven to 350 degrees F.
2. Spray 3 8" round cake pans with cooking spray with flour.
3. Whisk together the flour, baking powder, poppy seed, and salt in a medium bowl. Set aside.
4. In a clean, dry bowl, beat egg whites with a hand mixer or stand mixer with whisk attachment until foamy. Add cream of tartar and beat on high speed until stiff peaks form. Set aside.
5. Place butter in a clean bowl and beat on medium speed until smooth.
6. Add the sugar and beat until incorporated. Mix in the lemon zest. Beat the mixture on medium-high speed until light and fluffy.
7. Add 1/4 cup of the milk and beat until just blended. Reduce the speed to low and add the flour mixture alternately with the remaining milk in three batches, beginning and ending with the flour. Beat until just blended.
8. Using a rubber spatula, fold one quarter of the egg whites into the batter. Be careful not to deflate the mixture! Once incorporated, add in the rest of the whites and gently fold in until well combined.
9. Divide batter evenly between the three cake pans.
10. Bake for 18-20 or until a toothpick inserted in the middle comes out clean.
11. Let cool in pans for about 10 minutes and then flip them out onto a cooling rack or wax/parchment paper to cool completely.

For the Raspberry Curd Filling:

1. Melt the butter in a large saucepan over medium heat.
2. Add the raspberries, egg yolks, sugar and salt, and cook, mashing the berries. Stir frequently at first and then constantly at the end, until thickened, about 10 minutes.
3. Cool to room temperature. Cover and refrigerate until ready to serve.

For the Vanilla Lemon Cream Cheese Frosting:

1. Beat cream cheese, butter, lemon and vanilla extracts together until smooth and fluffy.
2. Add powdered sugar in 2 additions. Beat until creamy. Add more sugar or extract as needed for easy spreading.

Sunday, February 6, 2011

healthy recipe no. 8

Split Pea, Barley and Ham Soup
by Sara (with inspiration from my favorite childhood soup made by my mom)

Photographed by Sara

This soup is a real "belly warmer" (as my mom would call it). It's thick, hearty, very flavorful, filling, and easy to make. For the cold winter months this soup is great. This recipe makes enough for a family of 4-6 with possible left overs. I made it for myself and stored some in the refrigerator and some in the freezer for later. I hope you enjoy this great healthy recipe!

1 bag dried split green peas
6 1/4 cups of water plus 1/2 cup
1 can (15 oz) of low sodium chicken broth
1/2 cup dried barley
1/2 tablespoon butter
1 1/4 cup of chopped carrots
1/2 medium yellow onion, chopped
1/4 teaspoon dried oregano
cracked pepper and salt to taste
Optional: 1 pound ham (I used a cured smoked ham from Trader Joe's, but you could also use a ham hock; or omit the ham for a vegetarian soup)

1. In a large pot combine dried peas, 6 1/4 cup water, and chicken broth. Bring to a boil and then allow to simmer until most of the liquid has been absorbed, about 30-40 minutes.

2. Pour in 1/2 cup dried barley to pea mixture to soak up rest of the liquid, if needed you can add 1/2 cup of water to mixture to complete barley cooking.

3. In a separate pan melt butter and saute carrots, onions, oregano, salt and pepper in the melted butter. Once cooked down, after about 5 minutes, add carrot/onion mixture to the peas and barley.

4. If using ham, place a whole piece of ham to the pot and allow to continue. Once the barley is cooked, and pea mixture is thickened, remove the ham and cut into bite size pieces and return to soup. Your hearty, rustic soup is now done and ready to enjoy ...possibly with a piece of crusty bread!

Tip: If eating chilled soup, place in a saucepan on low-medium heat until warm or in the microwave for a few minutes. If the soup is too thick you can add a few tablespoons of water to thin down (you will most likely need to do this).

Saturday, January 29, 2011

sweet nothings {saturday}

You may be thinking....

or maybe not thinking....

it is Saturday right?

But anyways if you were thinking you may be wondering how 'sweet' and 'healthy' could go hand in hand?

Well after much searching and tweaking they can...

and taste pretty darn good if you are asking me...

but don't take my word for it, try this recipe (Adapted from Brown Eyed Baker) yourself!

GO...NOW....

it's Saturday, what else do you have to do?

Healthy {Peanut Butter-Oatmeal-Chocolate Chip} Cookies

Photographed by Sara
1 cup plus 2 tablespoons white whole wheat flour
½ cup rolled oats
1 teaspoon baking soda
¼ teaspoon salt
¼ cup coconut oil
¼ cup unsweetened applesauce
½ cup peanut butter (I use Trader Joe’s Valencia Peanut Butter with Roasted Flaxseeds, crunchy and salted)
¼ cup granulated white sugar
½ cup light brown sugar, lightly packed
½ teaspoon vanilla extract
1 large whole egg
1 cup semisweet chocolate chips

1. Preheat oven to 350 degrees F. Line two baking sheets with parchment paper and set aside.

2. Whisk together the flour, oats, baking soda and salt; set aside.

3. On medium speed, cream together the coconut oil, peanut butter, granulated sugar, brown sugar and vanilla extract. Add the egg, and applesauce and beat to combine. On low speed, gradually add the flour mixture until just combined. Stir in the chocolate chips.

4. Drop dough (2 Tablespoons) onto prepared baking sheets about 2 inches apart. Bake for 12-14 minutes, or until the cookies are lightly golden on the edges (do not overcook). Cool completely on the baking sheet and then store in an airtight container at room temperature.

Side note: If anyone is wondering why I used coconut oil and are wonder where to get that let me explain. My friend Kristin introduced me to coconut oil as a healthier substitute to butter. Coconut oil is a saturated fat just as butter is but its molecular combination is such that the body is easier able to metabolize it. Coconut oil is stored as a solid in a jar and can be found at most grocery stores in the bakery/oils area. To measure and use you simply run jar under hot water until desired amount of oil is liquefied then measure it in the liquid form. The remaining oil in the jar will solidify and store just fine at room temperature.

Sunday, January 23, 2011

healthy recipe no. 7

Banana Berry Protein Smoothie


This smoothie is the perfect for breakfast or for a post workout protein boost! Makes one for you and one to share, (if enjoying alone, this is an easy recipe to split in half).

1 Cup Milk (I used unsweetened almond milk)
1 scoop Vanilla Whey Protein Powder
1 bag of Yoplait Triple Berry Smoothie Mix (can also substitute for 1.5 cups of frozen strawberries, blueberries and raspberries)
1 Banana

Blend together in blender until smooth. Pour into 2 glasses and enjoy!

Thursday, January 20, 2011

healthy recipe no. 6

Chicken Salad
(recipe from my mom)


Serves a large crowd as a side or a family of 4-5 as a main meal

Salad:

One bag or medium sized salad bowl full of Spinach or mixed greens (or combo)
1 Can Mandarin oranges, drained
1/2 Cup Slivered almonds, toasted
1/2 small Red onion, diced
1 Avocado, diced
1 package Crumbled Top Ramen noodles (uncooked)
1 Roasted Chicken, meat shredded minus the skin
Mix all together. Dress with the following recipe just before eating.

Dressing:

½ C oil (canola or olive oil)
3 T red wine vinegar
2 T white sugar
½  tsp salt
½  tsp dry mustard
Fresh Ground Pepper
Seasoning packet from Top Ramen (Chicken Flavor)

Mix well with whisk or shake in a container, pour over salad just before eating. Dressing and salad (minus the avacado) can be made the day ahead and then combined just before serving.

Enjoy this yummy salad that could easily be served at a spa or bistro for lunch...it's that good!

Up Next: Berry Protein Smoothie

Monday, January 17, 2011

healthy recipe no. 5

Blueberry Banana Oatmeal Muffins
(Adapted by Me from Joy the Baker)


Makes 12-15 muffins


1 1/4 cups whole wheat flour
1 1/4 cups rolled oats (or 1 cup rolled oats, plus 1/4 cup flax meal, or oat bran)
1 tsp baking powder
1/2 tsp baking soda
1/4 tsp salt
1/2 tsp cinnamon
3/4 cup unsweetened applesauce
1 medium mashed ripe banana
1/2 cup low-fat buttermilk
1/4 cup firmly packed brown sugar
1TBS honey or agave sweetener
2 tbsp canola oil
1 large egg, lightly beaten
3/4 cup blueberries (fresh or frozen)

Preheat oven to 375 degrees.

Line a 12 cup muffin tin with paper cases or spray with nonstick cooking spray.
In a large bowl combine flour, oats, baking powder, baking soda, salt and cinnamon. In a medium bowl combine applesauce, banana, buttermilk, sugar, honey, oil and egg. Make a well in dry ingredients and add wet mixture. Stir until just moist. Fold in blueberries. Fill muffin cups 2/3 full.


Bake for 16-18 minutes.
 
Allow to cool in muffin tin for 5 minutes or so, then cool on rack.


Note: These muffins freeze beautifully.

Up Next: Chicken Salad

Sunday, January 16, 2011

healthy recipe no. 4

McCann's Irish Oatmeal


For this hearty breakfast I prepared 1/4 cup of McCann's Instant Irish Oatmeal according to the packaging (you could also use non-instant, regular oatmeal or steal-cut oatmeal, just prepare it according to the packaging). I then cut up half a honey crisp apple and stirred it in the oatmeal just before taking it off the stove. I also mixed in about 1 tsp of honey. It was a very filling breakfast full of fiber with great flavor and texture and I recommend it for your next breakfast!

Other topping options include:
- dried fruit
- nuts
- brown sugar
- Stevia (a natural sweetener from the Stevia leaf)
- berries

Up next: Blueberry Banana Oatmeal Muffins

Friday, January 14, 2011

healthy recipe no. 3

This recipe goes great as a breakfast side or as I like to have it as a healthy dessert. With oranges being in season, and a large bag of my favorite orange variety, Cara Cara's, from Costco, and a craving for something sweet, this recipe could not have been more perfect. This recipe has a little story behind it...In September, 2009 my old roommate, Megan, and I traveled to Spain. While in Barcelona we frequented a little cafe outside our hotel each morning for breakfast and each day we ordered the same 'desayuno natural' (translated: natural breakfast). This meal consisted of cheese drizzled with olive oil and sprinkled with dried oregano, a slice of nutty, grainy bread with a light tomato spread... AND...

Orange Slices with Honey and Cinnamon


1 Orange with the peel removed
Honey
Cinnamon

Slice peeled orange and in a single layer place slices on a plate. Drizzle oranges with honey and sprinkle with cinnamon. Enjoy the healthy sweetness!

Up Next: McCann's Irish Oatmeal

Thursday, January 13, 2011

healthy recipe no. 2

Sweet Potato, Leek and Ham Soup
(from Cooking Light, Fresh Food Fast)


Cooking spray
1 cup diced cooked ham (I used Canadian bacon)
1 1/2 cups sliced leek
2 TBS water (optional)
3 cups cubed peeled sweet potato (about 2 small-medium sweet potatoes)
1 cup fat-free, less-sodium chicken broth
2 cups water
1 (5-ounces) can evaporated fat-free milk
1/4 tsp freshly ground black pepper
Thinly sliced green onions (optional)

1. Heat a large Dutch over over medium heat. Coat pan with cooking spray. Add ham; cook 3 to 4 minutes or until browned, stirring frequently. Remove ham from pan; set aside.

2. Add leek to pan; coat with cooking spray. Cook leek, covered 5 minutes or until very tender, stirring occasionally. Add 2 tablespoons water to pan, if needed, to prevent burning.

3. Add cubed sweet potato and next 4 ingredients, scraping pan to loosen browned bits; bring mixture to a boil. Cover, reduce heat, and simmer 15 minutes or until sweet potato is very tender. Place half of potato mixture in a blender or food processor. Remove center piece of blender lid (to allow steam to escape); secure blender lid on blender. Place a clean towel over opening in blender lid (to avoid splatters). Process until smooth. Pour puree into a large bowl. Repeat procedure with remaining mixture. Return pureed mixture to pan. Stir in cooked ham. Ladle soup into bowls; garnish with sliced green onions, if desired.

Makes 4 servings, about 193 calories each.

Note: I really enjoyed the creaminess of this soup without the addition of any cream or butter. The one thing I may change about this soup is that the ham doesn't really add anything worthy of not leaving out. Next time I make it I may leave the soup out and rather eat it with half a sandwich to get my protein in.

Up next: Orange Slices with Honey and Cinnamon

Wednesday, January 12, 2011

healthy recipe no. 1

This recipe is going to be the first of my healthy recipe series (length unknown). I will start off with some recipes from a Cooking Light cook book, Fresh Food Fast, since all the recipes have minimal ingredients, are healthy, and are quick and easy to make. I will try to mix it up with things I create, recipes from the Internet, and other cook books I have lying around that I have neglected to use. If you have any suggestions or requests for recipes just let me know, I am excited about this journey towards eating more healthful foods and I am excited to share it with you all! Enjoy!


Sausage and Barley Soup
(from Cooking Light, Fresh Food Fast)

Cooking spray
6 oz. uncooked Italian Turkey Sausage (I used Jennie-O)
2 1/2 cups frozen bell pepper stir-fry
2 cups water
1 (14 1/2-ounce) can Italian-style stewed tomatoes, undrained and chopped
1/4 cup uncooked quick-cooking barley (or if you have regular barley I part way cooked mine before adding it to the soup)
1 cup coarsely chopped fresh baby spinach

1. Heat a large saucepan over medium-high heat. Coat pan with cooking spray. Remove sausage from the casing and place in pan. Cook til browned and in crumbles. Remove from heat.

2. While the sausage is cooking place stir-fry bell peppers and 2 cups water in a blender; process until smooth. Add stir-fry puree, tomatoes and barley to sausage in a pan. Bring mixture to a boil over high heat; cover, reduce heat to low, and simmer 10 minutes. Stir in spinach, cook one minute until spinach wilts. Place in serving bowls to serve and enjoy or place into 4 glass containers to store for later. (I placed 2 containers in the refrigerator for this week and 2 in the freezer for later)

Makes 4 servings, about 145 calories each!

Pictured above served with Parmesan Crusted Toast! (Not in the calorie total)

Up next: Sweet Potato, Leek, and Ham Soup

Sunday, January 9, 2011

bread pudding

This is the amazing recipe for the dessert, Bread Pudding with Whiskey Sauce, we had on Christmas night. It is one of my mom's amazing desserts and anytime you need something sweet to share that is not difficult to make you will not be disappointed with this one! This was just too good to not share but I promise to share some of my newly discovered healthy recipes real soon!


Pictured minus the sauce
Pudding

¾ C Raisins
2 TBS Dark Rum
1 lb. French bread, cut into 1” cubes
3 C Whole Milk
1 C Half & Half
3 Eggs, Beaten to blend
2 C Sugar
2 TBS Unsalted Butter, melted
2 TBS Vanilla
½ tsp Cinnamon

Sauce

½ C (1 Stick) Unsalted butter
½ C Firmly packed brown sugar
1 egg
3 TBS Whiskey

1. Place raisins in small bowl. Pour rum over. Let soak 20 minutes.

2. Preheat oven to 325 degrees F. Generously butter 13 x 9 x 2 inch baking pan.

3. Place bread in large bowl. Pour milk and half & half over the bread. Let soak for 5 minutes.

4. Whisk egg with sugar, butter, vanilla, & cinnamon in a medium bowl. Pour over bread. Add rum soaked raisins and toss to coat.

5. Transfer bread mixture to prepared pan. Bake until top is deep golden brown (may puff above rim of pan) about 1 hour.

6. Spoon warm bread pudding onto plates. Spoon sauce over the bread pudding. Top with dollops of whipped cream and serve.

ENJOY!

Sunday, December 19, 2010

cake pops


Cake pops are the hottest fashion for serving your favorite cake. Between cupcakes, cake pops and whoopie pies; cake is sure taking the center stage on many websites, blogs, shops, and even TV shows! For my work Christmas party I wanted to contribute something fun and festive and of course have the opportunity to bake so I decided to make cake pops. Let me just tell you that that cake pop making experience may be my first and last! Those puppies are not easy to make. Luckily I did not try to cram it the steps into one day or even two. Please forgive the lack of pictures throughout the steps, I was too focused on trying to get the steps down that I gave up taking pictures after the first step.

Step 1: The first day I made 2 different types of cake red velvet (I thought the red would be fun for Christmas) and chocolate (cause lets face it, who doesn't like chocolate). I could have just made one and it would have been enough, but I learned from my mom and always make too much food for parties, so 2 cakes I had. After they cooled I stored them to use later for step 2.

Step 2: I crumbled each of the cakes into their own bowl using a fork. For the red velvet cake I mixed a jar of cream cheese frosting. (This made a really soft mixture and I would recommend using 2/3 -3/4 of the jar of frosting rather than the whole thing.) The frosting mixes in completely so eventually you don't see the frosting and it is about the consistency of cookie dough. For the chocolate cake I mixed in 2/3 jar of milk chocolate frosting. This yielded a much better consistency for step 3.

Step 3: Step 3 is done on the same day as step 2. You can use a spoon or a small ice cream or cookie dough scoop would be helpful to take a piece of the cake mixture and roll it into a ball (Mine where about the size of a ping pong ball but they could definitely be smaller.) Place on a lined cookie sheet or cake pan. Once the pan is full place in the refrigerator or freezer (I had read that the freezer makes them too hard but my fridge didn't get them cold enough to do step 4, so I had to put them in the freezer). Leave them chilled.

Step 4: This step can be done the day before you wish to serve them or even the day of. Using a double boiler, melt chocolate (I used colored chocolate from Micheal's Craft Store). Not until the chocolate is melted should you take the cake balls out of their chilled location. Place the cake ball on a stick to make it a cake pop or leave alone to have just a cake ball. Cover the ball or pop in the melted chocolate then if desired immediately sprinkle with some decorative sugar sprinkles, or candy, or whatever! I allowed mine to harder while stuck in a Styrofoam block; if you decided to have them cool while lying on wax paper you will have a flat side to your ball. Once they cooled and the chocolate hardened I gently layed them flat on a cookie sheet and covered in plastic wrap.

Step 5: This step should be done the day you plan to serve them. This step was the most fun part for me, it's all about the display! I decided to make a cake pop bouquet with mine. I placed Styrofoam into a Christmas-y container and then covered the foam with shredded paper and red tinsel-y strips. The cake pops where placed into the foam and stayed pretty well (that is until I had to put the arrangement into my car and drive to the party and it fell over : (, luckily not too much damage was done and they still tasted great! I have also seen people place the cake pops upside down or the cake balls themselves in cupcake wrappers. You can get creative with how you display your cake pops/balls and regardless of how they are displayed everyone will be excited to eat them!

Cake Pop Bouquet!

Here you can see the moist cake inside with the sprinkle covered white chocolate outside!

Tuesday, November 30, 2010

nana's ricotta gnocchi


Ever since I can remember, my great-grandma's ricotta gnocchi have been one of my favorite pastas and dishes in general. My grandma, Nana, has carried on the tradition of hand making these gnocchi to share with the family. Even as a child Nana started to teach me how to make gnocchi and although I've made them a handful of times, I still have a ways to go til they are as perfect as when Nana makes them. The good news with gnocchi, no matter what they look like, it is hard for them to not still taste good. These gnocchi taste different than the potato gnocchi you usually see in stores and restaurants. Ricotta gnocchi are tender, delicate, and smaller than the potato counterpoint.

My great-grandmother came to the United States from the southern Italy region of Calabria as a young women just in time to get married to a man she had not met. They had 6 children together which she then raised alone after her husband died of pneumonia. From all the stories Nana has told me about her she seems like a very strong, courageous, and resourceful woman.

Growing up my family usually came to spend Thanksgiving at Nana and Papa's house and then later they came to our home. The Friday after Thanksgiving was ALWAYS gnocchi/Italian night. Nana would make a few pounds of gnocchi and bring them frozen to where ever we happened to be for dinner that night. The gnocchi are always a crowd pleaser.

I decided it would not feel like Thanksgiving without gnocchi, so the week before Thanksgiving I made some homemade ricotta gnocchi. I didn't think the frozen gnocchi would travel well with out a cooler so I kept them here in San Diego and have been enjoying them for a few different dinners now. There are not many foods that warm my heart and bring about memories like these gnocchi do for me!

Homemade Ricotta Gnocchi

1 lb Ricotta Cheese (do not use low or non fat)
1 whole egg

Mix with fork

Add all-purpose flour~ about 1 1/2 to 2 cups (enough until dough is easy to handle, should be slightly stiff)

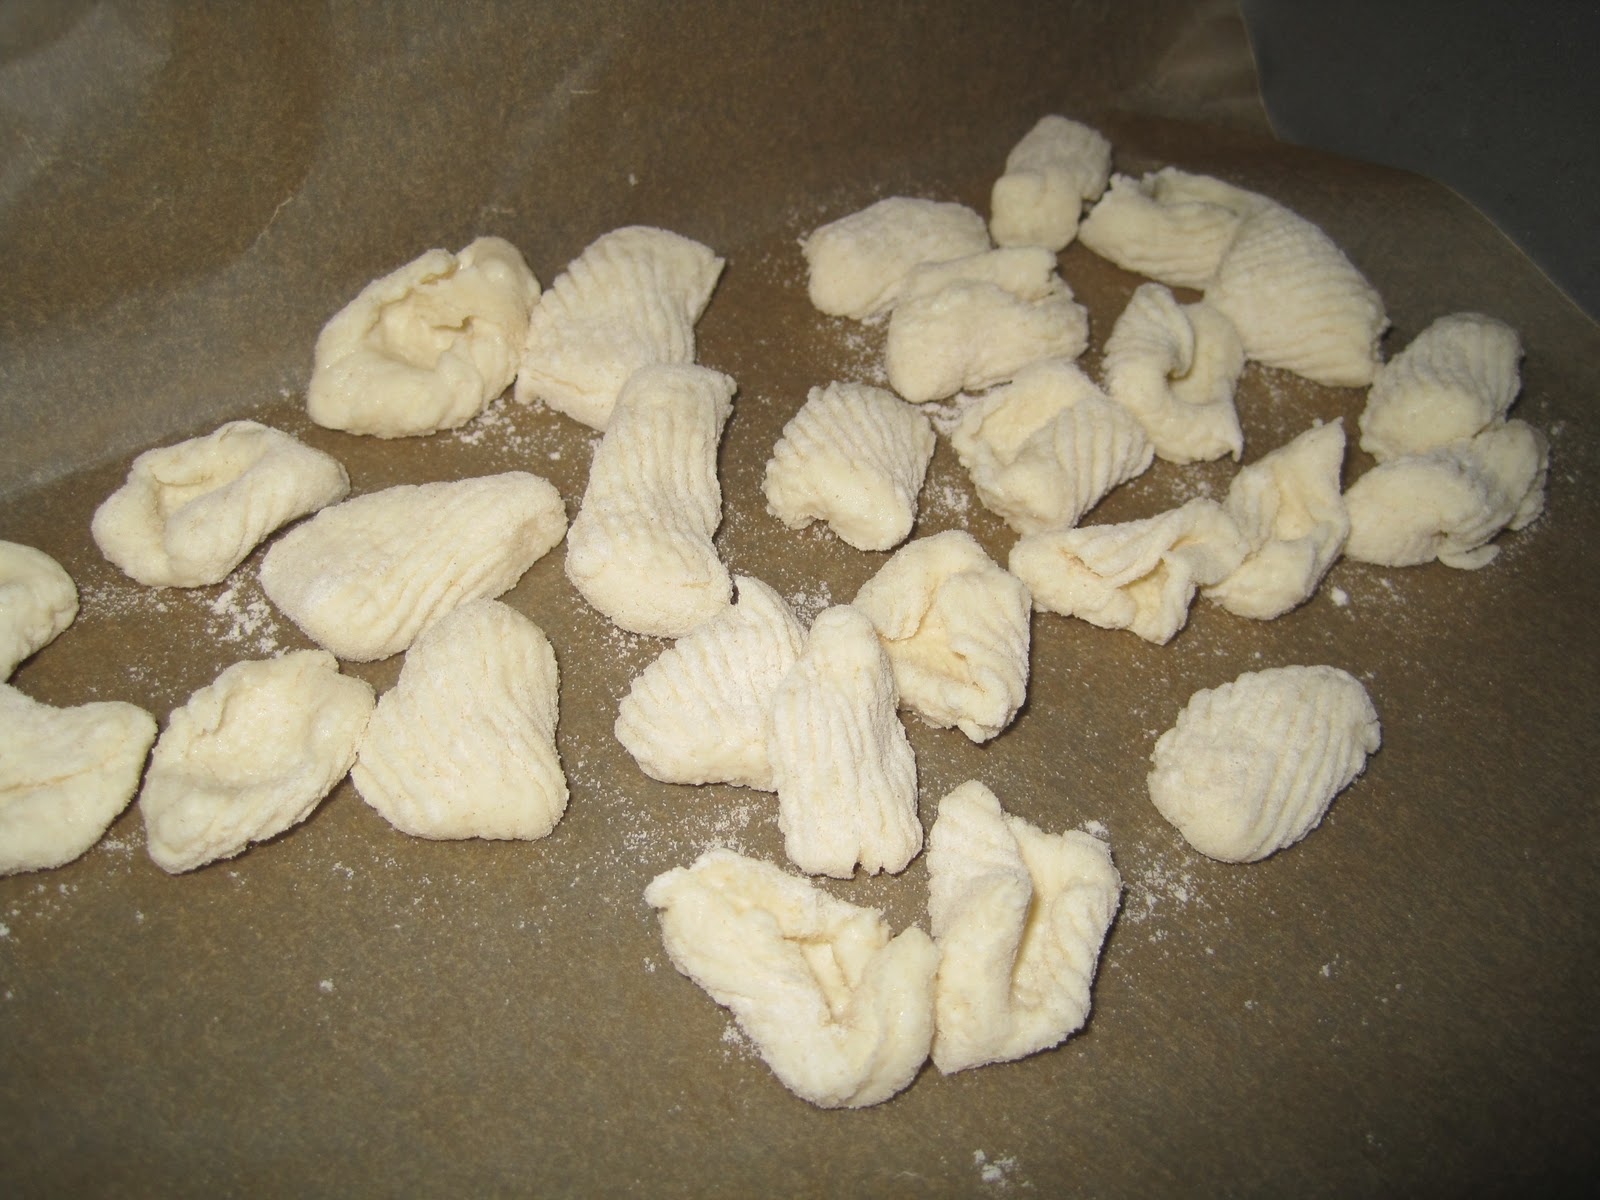
Once dough comes together in a ball and is workable, put dough on a plate and cover with a bowl. Take a small piece of dough and roll to about the size of your finger. Cut into pieces about 3/4 inch. Lightly flour gnocchi board (board with ridges) or use a the grooves on a fork. With your index finger, roll each piece on the board or fork towards you, pressing hard enough to curl dough. This makes ridges on the outside and hollows out the inside of the dough.


Put a piece of wax or parchment paper on a cookie sheet and fill with a single layer of gnocchi. Once cookie sheet is filled, place in freezer for about 20 minutes. Once they are frozen, peal off the paper, break them apart from each other if stuck, then place in a gallon sized plastic bag, and store in the freezer. Repeat until done.


 When you desire to have your gnocchi, place desire portion in a pot of boiling water. Make sure to use a pot large enough not to over crowd gnocchi, otherwise they may be mushy. When the gnocchi first go in the pot they will sink to the bottom, slowly one by one the gnocchi will begin to float to the surface of the water. Just as they all rise,which just takes a few minutes since the pasta is fresh, immediately drain in a colander.


 Lightly mix with your favorite basic tomato sauce and freshly grated Parmesan cheese (optional). Serve immediately, it cools off quickly. Enjoy!

Wednesday, November 24, 2010

homemade bread

The smell of fresh, homemade bread coming out of the oven is one of those heavenly scents that conjures up a cozy, warm, homey feeling. I have longed wanted a bread maker and have always said it will be the first thing on my wedding registry, and although I still do not have one I did not let that stop me from making some homemade multi-grain bread loaves courtesy of Martha Stewart. This recipe makes 2 loaves of dense bread that is perfect for slicing and pairing with your favorite jam or with your favorite sandwich toppings.

Multi-grain Bread

2 pkg (1/4-ounce envelopes) active dry yeast
2 1/4 cups warm water
3 Tablespoons plus 2 teaspoons honey
4 Tablespoons unsalted melted butter, plus more for bowl and pans
3 cups all-purpose flour
3 cups whole wheat flour
1 cup rye flour
1/3 cup toasted bran (I found mine at Trader Joe's)
1/2 cup rolled oats
1/4 cup ground or whole flaxseeds
egg wash-egg white whisked together with water
2 Tablespoons coarse salt


1. Sprinkle yeast over 1/2 cup warm water. Add 2 teaspoons honey. Whisk until yeast dissolves. Let stand until foamy, about 5 minutes. Transfer to the bowl of a mixer fitted with paddle or dough-hook attachment. Add butter and remaining 1 3/4 cup water and 3 Tablespoons honey. In a separate bowl, whisk all-purpose flour, whole wheat flour and rye flour together with salt. Add 3 cups of flour mixture to yeast mixture. Mix on low speed until smooth, do not over mix. In another bowl, mix oats, flaxseeds and bran together. Add this mixture to the mixing bowl. Add remaining 4 cups of flour, 1 cup at a time, mixing until dough comes away from sides of bowl and forms a ragged, slightly sticky ball. Butter a large bowl.

2. Knead dough on a floured surface until smooth and elastic but still slightly tacky about 5 minutes. Shape into a ball. Transfer to prepared bowl; cover with plastic wrap and a towel and place in a warm area.

3. Let dough stand in warm place until it doubles in volume (it should not spring back when pressed), about 1 hour. Butter two 4 1/2 by 8 1/2 inch loaf pans. Punch down dough; divide in half.

4. Shape 1 dough half into an 8 1/2 inch long rectangle (about 1/2 inch thick). Fold long sides of dough in to middle, overlapping slightly. Press seam to seal. Transfer dough, seam side down, to pan. Repeat with remaining dough. Brush tops of loaves with egg wash, then sprinkle with oats. Dab tops with egg wash to help adhere. Preheat oven to 450 deg F. Drape loaves with plastic. Let stand until dough rises about 1 inch above tops of pans, 45 minutes to 1 hour. Reduce oven temperature to 400 deg. Bake, rotating pans after 20 minutes, until tops are golden brown, about 45 minutes. Transfer to wire racks. Let cool slightly; turn out loaves. Let cool completely before slicing. Enjoy!

Tuesday, November 23, 2010

crock pot chicken tacos


I was introduced to this easy recipe when I used to babysit for a family with 4 kids, this was an easy to make and easy to please meal to make for us! I recently found a 3 quart sized crock pot at Target on sale for $15, I grabbed it and my first meal I made was crock pot chicken tacos.

To start place as much chicken as you want for your family, or for extras (stores well in refrigerator for a few days), in your crock pot. I used 2 chicken breasts which made 5 servings of 2 tacos.


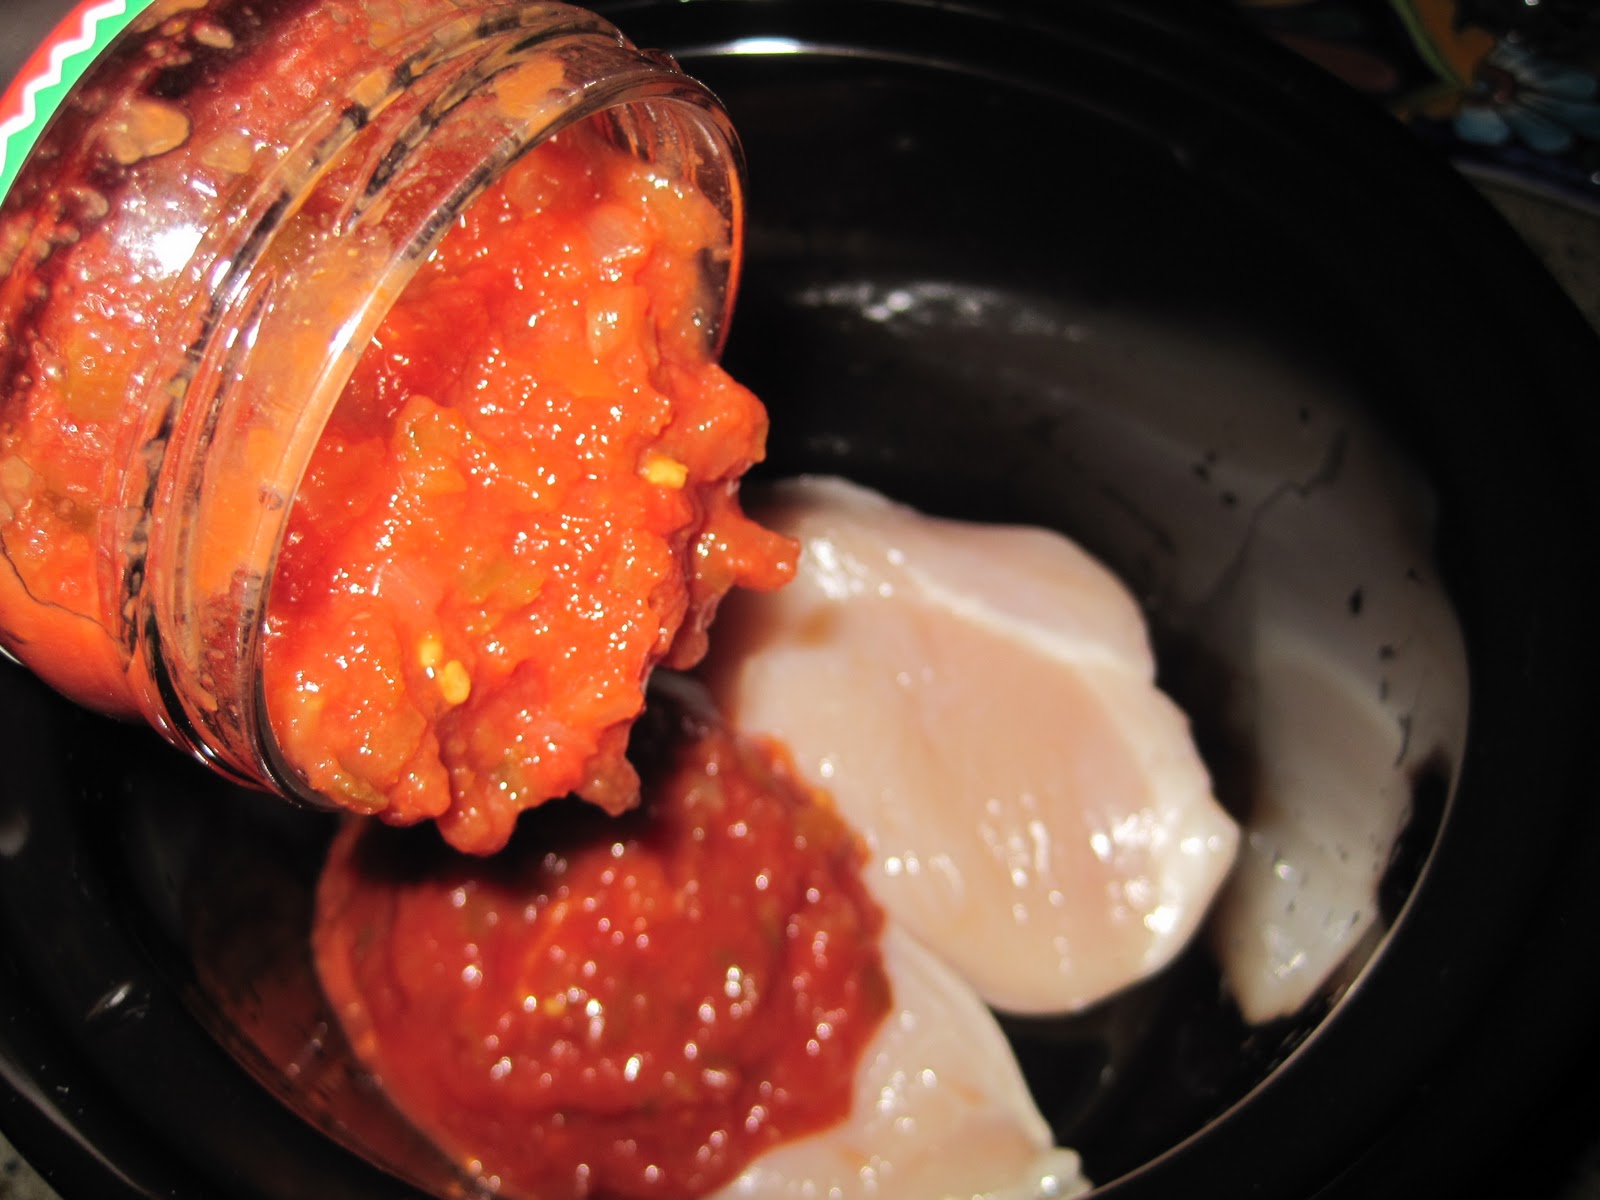
Pour any kind of salsa over the chicken making sure to cover all the chicken. I used Trader Joe's Chunky Salsa, really anything will work though. For the 2 chicken breasts I needed one whole jar, so you will need more than one jar if using more chicken.


Here it is before cooked with chicken covered in salsa. Set crock pot on low if you want it to cook all day or use high if you will be ready to eat in 3-4 hours.


Here is what is in the crock pot when it is ready to shred, you can see the salsa has reduced and the chicken is cooked.


Using a fork pierce the chicken and use a turn of your wrist to "shred" the chicken. Repeat until all the chicken is shredded and mixed evenly.


Here is the shredded chicken ready to go into a taco or burrito.


I used a warmed corn tortilla, placed some of the crock pot chicken  with tomato and avocado slices on top.


Get creative with it...there are so many possibilities! ENJOY!

Monday, September 27, 2010

I heart crumpets


It was this easy to miss shop, The Crumpet Shop, in Seattle, WA, tucked away off the side street leading up to Pike's Place Market that got me hooked on crumpets. While visiting this past Spring, my friend Kristin and I went to this shop she had been raving about after a past visit she had there. I had never had a crumpet until that very day and let me say I am very happy that the crumpet and I met! A crumpet is similar to an English muffin yet a little more moist, and the nooks and crannies are on the top rather than the inside as an English muffin. Here are some fresh baked crumpets from the shop.

Photo from Roadfood.com

After having 2 crumpets of my own and sharing a 3rd, I left the shop with my Seattle souvenir...a bag of 6 plain crumpets! These crumpets did not stick around for long because I quickly found many ways to top them and enjoy their deliciousness! My favorite ways to enjoy a crumpet are with berry jam, nutella, and egg but the shop has many more mouth watering options! Finishing my crumpets from The Crumpet Shop, resulted  in great sadness, this was until I discovered  that Trader Joe's has crumpets (in plain and blueberry). I have been able to enjoy crumpets now once again (although I have to admit they are not quite as fresh and tasty as the ones from "the shop")! I even picked up some nutella so I could enjoy my crumpet the way I loved that wonderful day back in May!


When in Seattle make sure to stop but The Crumpet Shop for some breakfast, lunch or just a bite to eat and a coffee you will surely not be disappointed that you did. And for those of you who do not live in the Seattle area and don't have a trip planned but your mouth is watering after reading this post, head to Trader Joe's pick up a pack of crumpets (usually in the bread section near the English muffins), toast your crumpet, top with butter and then add jam, nutella or a scrambled egg and  ENJOY!

Tuesday, August 31, 2010

when life gives you tomatoes...

...make Caprese Pasta Salad!

The organic cherry tomato plant I planted back in March has produced many tomatoes for me. This whole summer I have not had to buy tomatoes! Despite watering every day, sometimes twice, the plant has for some reason lost all its leaves yet is still ripening the existing tomatoes on its branches. I am expecting however that after all the existing tomatoes are ripened and picked that will be the end of the plant and I will replace the plant with something to survive the Fall/Winter months. I am pleased that my first gardening experience has been so fruitful.

Before work the other night this is the creation I came up with for dinner using some of my organic cherry tomatoes!


To make this you start with the following ingredients:


Cherry Tomatoes (cut in half)
Fresh Basil
Balsamic vinaigrette (I happen to really like the one from Trader Joe's, and it's fat free!)
Cooked Pasta (I would recommend bow tie, fussili or penne for this)
Fresh Mozzarella balls (cut in half)

Mix all ingredients in amounts that you like you really cannot go wrong any way! Enjoy it warm, cold, or over spinach as a salad.


What are some of you favorite things to make using tomatoes?

Wednesday, August 25, 2010

lets go dutch baby!


A few weeks ago, Pati, Leith (Pati's husband), Isaiah (their baby), and I all met at The Original Pancake House in San Diego one morning after I got off of work. We were all very excited for this considering none of us had been before. I was encouraged to order the German Pancake (pictured above) by one of the doctors I work with who goes there frequently. Since my brain was mush after working a 12 hour shift I did just that. The German Pancake is well one, very huge, second, just like a Dutch baby, and third, very light and yummy. It is sprinkled with powdered sugar and served with lemon wedges for drizzling, more powdered sugar, butter, and syrup. I put a little butter and lemon on mine and it was fabulous. Pati got chocolate chip pancakes which she said were great, Leith got just about one of everything and ate it all of course, and Isaiah was content with his earlier meal of breast milk! We were all delighted to find a new breakfast joint with good food, reasonable prices, good service, and no wait time!

Ever since this trip to The Original Pancake House I have been craving this "pancake". I remembered I had a Dutch baby recipe that I had printed and kept to use at a later date from the Williams-Sonoma website. This is one of a few recipes I have found on this site that are just fabulous and not difficult to make. When I woke up today and couldn't sleep I thought this would be the perfect thing to fill me up and hopefully put me into a food coma to get a few more hours in before I had to work night shift. So that's what I did! I made the Dutch baby recipe and it turned out to be slightly better than the one from restaurant, very easy to make and looks just like the German Pancake from the The Original Pancake House. To see how I made the Dutch Baby follow the steps below.

Bob's Dutch Baby (from Williams-Sonoma)

Ingredients:
5 tablespoons butter (I think you could get away with only using 4)
3/4 Cup all-purpose flour
3 eggs
3/4 cup milk
1/2 teaspoon salt

Topping Options:
3 Cups cut fruit (berries would be great)
Powdered Sugar with Fresh Lemon Juice
Warmed Jam
Syrup

Directions:
Adjust the rack to the upper third of the oven. Turn on the oven to 450*F

Put the butter in a very large (12-inch) skillet with an ovenproof handle.


Set in the oven for 5 minutes to melt the butter completely (okay if it begins to brown).


While the butter melts, measure the flour into a large bowl. Add the eggs, milk, and salt.


Beat until smooth, using a whisk, large spoon, or handheld electric mixer.


Take the pan out of the oven...


and immediately pour the batter into the hot pan.


Return the pan to the oven and bake for 15 to 20 minutes, until the sides are puffed up and dark golden brown. Remove the pan from the oven.


Loosen the Dutch baby from the sides and bottom of the skillet, then slide it onto a serving plate.


Top with your favorite topping. I topped mine with some powdered sugar, fresh lemon juice, and warmed marionberry jam...Yum!


Enjoy!